2508 Tuam St C Houston TX 77004 – Third-party Energy Test: Blower Door & Duct Test

2508 Tuam St C Houston TX 77004
Third-party Energy Testing
Blower Doors: What Are They and How Do They Work?
A blower door is a device used in energy testing to measure a building’s airtightness. It consists of a powerful fan mounted on a temporary frame that fits into a doorway or an exterior opening. During a blower door test, the fan creates a pressure difference between the inside and outside of the building. This pressure difference allows air leakage points to become apparent and measurable. The test helps identify areas of air infiltration or exfiltration, which can affect energy efficiency and indoor comfort.
The blower door test involves setting up the device, measuring the baseline pressure, and then either depressurizing or pressurizing the building using the fan. While the fan is running, the airflow rate is measured using instruments like a manometer or pressure gauge. This airflow measurement quantifies the amount of air leakage in the building. Smoke pencils or thermal imaging cameras can be used to locate specific air leakage points.
The blower door test can be conducted in both depressurization and pressurization modes, allowing for a comprehensive assessment of air leakage locations. Once the test is complete, the data is analyzed to determine the building’s airtightness and identify areas that need improvement. The results can be used to guide air sealing measures and improve energy efficiency.
Blower door tests are crucial in identifying air leakage points, reducing energy loss, improving indoor air quality, and enhancing the overall performance and comfort of a building.
Home Inspection Atascocita | Home Ready Inspections | Houston TX
1038 W 17th St Houston TX 77008 – Third-party Energy Test: Blower Door & Duct Test

1038 W 17th St Houston TX 77008
Third-party Energy Testing
Blower Doors: What Are They and How Do They Work?
A blower door test is a powerful fan that a trained energy professional temporarily mounts into the frame of an exterior doorway in your home. After calibrating the device, the fan pulls air out of the house, lowering the air pressure inside. The higher outside air pressure then flows in through all unsealed gaps, cracks and openings such as gaps, cracks, or wiring penetrations. If conditions do not allow for lowering the pressure in the home, the fan may also be operated in reverse, with air pressure increased inside the home.
While the blower door test is being conducted, the analyst may use an infrared camera to look at the walls, ceilings, and floors, to find specific locations where insulation is missing, and air is leaking. The analyst may also use a nontoxic smoke pencil to detect air leaks in your home. These tests determine the air infiltration rate of your home, which is recorded on a laptop or tablet.
The blower door test is conducted as part of the energy assessment of your home. Your contractor may also operate the blower door while performing air sealing (a method known as blower door assisted air sealing), and after to measure and verify the level of air leakage reduction achieved.
Blower doors consist of a frame and flexible panel that fit in a doorway, a variable-speed fan, a digital pressure gauge to measure the pressure differences inside and outside the home, which are connected to a device for measuring airflow, known as a manometer.
There are two types of blower doors: calibrated and uncalibrated. It is important that auditors use a calibrated door. This type of blower door has several gauges that measure the amount of air flowing out of the house through the fan.
Uncalibrated blower doors can only locate leaks in homes. They provide no method for determining the overall tightness of the home.
The calibrated blower door’s data allow your contractor to quantify the amount of air leakage prior to installation of air-sealing improvements, and the reduction in leakage achieved after air-sealing is completed.
Professional energy assessors use blower door tests to help determine a home’s airtightness. Our blower door instructional video illustrates how a blower door test is performed, and how your contractor utilizes the diagnostic information provided to identify areas of air leakage in your home and make energy-saving improvements.
45L Home Tax Credit – 5 Falling Leaf Ct, Friendswood, TX 77546

5 Falling Leaf Ct, Friendswood, TX 77546
Understanding the 45L Tax Credit: Boosting Energy Efficiency in Homes
In recent years, there has been a growing global emphasis on reducing energy consumption and promoting sustainable practices. Recognizing the significant impact that buildings have on energy usage, governments and organizations worldwide have implemented various incentives to encourage energy-efficient construction. One such incentive in the United States is the 45L tax credit, aimed at promoting energy efficiency in residential properties. In this blog post, we will delve into the details of the 45L tax credit and explore its significance in driving greener and more sustainable housing.
The 45L tax credit, established as part of the Energy Policy Act of 2005 and extended multiple times since, is an initiative aimed at incentivizing the construction of energy-efficient homes. The credit provides financial benefits to eligible builders and developers for the construction or renovation of dwellings that meet specific energy-saving criteria. The name “45L” refers to the tax code section under which this credit is outlined.
To qualify for the 45L tax credit, residential properties must meet certain energy efficiency standards. These standards primarily focus on reducing the energy consumption of the building envelope (i.e., the walls, roof, windows, and doors). Here are some key eligibility criteria:
1. Dwelling Units: The tax credit applies to newly constructed or substantially renovated residential properties containing three or more dwelling units.
2. Energy Efficiency Requirements: The energy efficiency of the dwelling must be at least 50% higher than the energy consumption levels mandated by the 2006 International Energy Conservation Code (IECC), with certain additional requirements for insulation, heating, cooling, and ventilation systems.
3. Certification: An independent, qualified third-party must certify that the property meets the energy efficiency criteria and is eligible for the tax credit.
Benefits and Impact:
The 45L tax credit offers financial benefits to builders and developers, promoting the construction of energy-efficient homes. The credit amount is $2,000 per dwelling unit that meets the eligibility requirements. For example, if a newly constructed apartment building contains 50 eligible units, the builder could receive a tax credit of $100,000.
Beyond the immediate financial benefits, the 45L tax credit encourages sustainable practices and has several positive impacts:
1. Energy Conservation: By incentivizing the construction of energy-efficient homes, the 45L tax credit contributes to reducing energy consumption, decreasing reliance on non-renewable resources, and mitigating environmental impacts.
2. Cost Savings: Energy-efficient homes built under this credit can result in lower utility bills for homeowners, enhancing affordability and providing long-term cost savings.
3. Job Creation: The construction and renovation of energy-efficient dwellings create employment opportunities in the green building sector, stimulating economic growth and supporting local communities.
The 45L tax credit plays a significant role in promoting energy efficiency in residential properties, driving sustainable construction practices, and fostering a greener future. By incentivizing the development of energy-efficient homes, this tax credit benefits builders, homeowners, and the environment alike. As the demand for sustainable living continues to grow, initiatives like the 45L tax credit provide a valuable impetus towards creating energy-efficient communities and reducing our carbon footprint.
Call today to schedule your Blower Door and Duct Blaster test today.
832-661-6154
45L Home Tax Credit – 5043 Jefferson St B Houston TX 77023

5043 Jefferson St B Houston TX 77023
45L Home Tax Credit
If you are building between 2015 and 2018 standards, you qualify for the 45L Home Tax Credit. Call us for more information. Home Ready Inspections is certified by an accredited Rating Provider to inspect and test a home in order to evaluate each of the minimum rated features and complete a Home Energy Rating according to the RESNET Standards.
Call today to schedule your Blower Door and Duct Blaster test today.
832-661-6154
45L Home Tax Credit – 4814 Park Ave Dickinson TX 77539

4814 Park Ave Dickinson TX 77539
45L Home Tax Credit
If you are building between 2015 and 2018 standards, you qualify for the 45L Home Tax Credit. Call us for more information. Home Ready Inspections is certified by an accredited Rating Provider to inspect and test a home in order to evaluate each of the minimum rated features and complete a Home Energy Rating according to the RESNET Standards.
Call today to schedule your Blower Door and Duct Blaster test today.
832-661-6154
45L Home Tax Credit – 4927 E Ridge Creek Dr Houston TX 77053

4927 E Ridge Creek Dr Houston TX 77053
45L Home Tax Credit
If you are building between 2015 and 2018 standards, you qualify for the 45L Home Tax Credit. Call us for more information. Home Ready Inspections is certified by an accredited Rating Provider to inspect and test a home in order to evaluate each of the minimum rated features and complete a Home Energy Rating according to the RESNET Standards.
Call today to schedule your Blower Door and Duct Blaster test today.
832-661-6154
45L Home Tax Credit – 3802 Ella Blvd Houston TX 77018

3802 Ella Blvd Houston TX 77018
45L Home Tax Credit
If you are building between 2015 and 2018 standards, you qualify for the 45L Home Tax Credit. Call us for more information. Home Ready Inspections is certified by an accredited Rating Provider to inspect and test a home in order to evaluate each of the minimum rated features and complete a Home Energy Rating according to the RESNET Standards.
Call today to schedule your Blower Door and Duct Blaster test today.
832-661-6154
45L Home Tax Credit – 3708 Creekmont Green Ln Houston TX

3708 Creekmont Green Ln Houston TX 77091
45L Home Tax Credit
If you are building between 2015 and 2018 standards, you qualify for the 45L Home Tax Credit. Call us for more information. Home Ready Inspections is certified by an accredited Rating Provider to inspect and test a home in order to evaluate each of the minimum rated features and complete a Home Energy Rating according to the RESNET Standards.
Call today to schedule your Blower Door and Duct Blaster test today.
832-661-6154
45L Home Tax Credit – 3514 Grennoch Ln Houston, TX 77025

3514 Grennoch Ln Houston, TX 77025
45L Home Tax Credit
If you are building between 2015 and 2018 standards, you qualify for the 45L Home Tax Credit. Call us for more information. Home Ready Inspections is certified by an accredited Rating Provider to inspect and test a home in order to evaluate each of the minimum rated features and complete a Home Energy Rating according to the RESNET Standards.
Call today to schedule your Blower Door and Duct Blaster test today.
832-661-6154
45L Home Tax Credit – 2454 Druid St Houston TX 77091

2454 Druid St Houston TX 77091
45L Home Tax Credit
If you are building between 2015 and 2018 standards, you qualify for the 45L Home Tax Credit. Call us for more information. Home Ready Inspections is certified by an accredited Rating Provider to inspect and test a home in order to evaluate each of the minimum rated features and complete a Home Energy Rating according to the RESNET Standards.
Call today to schedule your Blower Door and Duct Blaster test today.
832-661-6154
45L Home Tax Credit – 2007 Marthoman Dr Missouri City TX 77489

2007 Marthoman Dr Missouri City TX 77489
45L Home Tax Credit
If you are building between 2015 and 2018 standards, you qualify for the 45L Home Tax Credit. Call us for more information. Home Ready Inspections is certified by an accredited Rating Provider to inspect and test a home in order to evaluate each of the minimum rated features and complete a Home Energy Rating according to the RESNET Standards.
Call today to schedule your Blower Door and Duct Blaster test today.
832-661-6154
45L Home Tax Credit – 1705 Reverse Street Houston, TX 77055

1705 Reverse Street Houston, TX 77055
45L Home Tax Credit
If you are building between 2015 and 2018 standards, you qualify for the 45L Home Tax Credit. Call us for more information. Home Ready Inspections is certified by an accredited Rating Provider to inspect and test a home in order to evaluate each of the minimum rated features and complete a Home Energy Rating according to the RESNET Standards.
Call today to schedule your Blower Door and Duct Blaster test today.
832-661-6154
102 E 44th St Unit B Houston TX 77018 – Minimizing Energy Losses in Ducts
 Minimizing energy losses in ducts
Minimizing energy losses in ducts by seeing if the ducts are poorly sealed or insulated. That could tell you why your energy bill in high. Your air ducts are one of the most important systems in your home, and if the ducts are poorly sealed or insulated, they are likely contributing to higher energy bills.
Your home’s duct system is a branching network of tubes in the walls, floors, and ceilings; it carries the air from your home’s furnace and central air conditioner to each room. Ducts are made of sheet metal, fiberglass, or other materials.
Ducts that leak heated air into unheated spaces can add hundreds of dollars a year to your heating and cooling bills, but you can reduce that loss by sealing and insulating your ducts. Insulating ducts in unconditioned spaces is usually very cost-effective. Existing ducts may also be blocked or may require simple upgrades.
Designing and Installing New Duct Systems
In new home construction or in retrofits, proper duct system design is critical. In recent years, energy-saving designs have sought to include ducts and heating systems in the conditioned space.
Efficient and well-designed duct systems distribute air properly throughout your home without leaking to keep all rooms at a comfortable temperature. The system should provide balanced supply and return flow to maintain a neutral pressure within the house.
Even well sealed and insulated ducts will leak and lose some heat, so many new energy-efficient homes place the duct system within the conditioned space of the home. The simplest way to accomplish this is to hide the ducts in dropped ceilings and in corners of rooms. Ducts can also be located in a sealed and insulated chase extending into the attic or built into raised floors. In both of these latter cases, care must be taken during construction to prevent contractors from using the duct chases for wiring or other utilities.
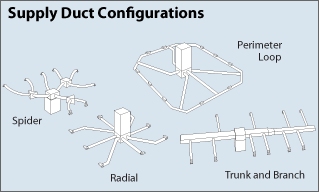
In either case, actual ducts must be used — chases and floor cavities should not be used as ducts. Regardless of where they are installed, ducts should be well sealed. Although ducts can be configured in a number of ways, the “trunk and branch” and “radial” supply duct configurations are most suitable for ducts located in conditioned spaces.
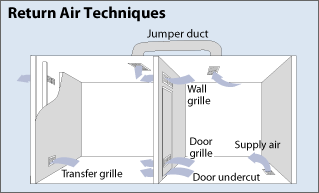
Air return duct systems can be configured in two ways: each room can have a return duct that sends air back to the heating and cooling equipment or return grills can be located in central locations on each floor. For the latter case, either grills must be installed to allow air to pass out of closed rooms, or short “jumper ducts” can be installed to connect the vent in one room with the next, allowing air to flow back to the central return grilles. Door undercuts help, but they are usually not sufficient for return airflow.
You can perform a simple check for adequate return air capacity by doing the following:
- Close all exterior doors and windows
- Close all interior room doors
- Turn on the central air handler
- “Crack” interior doors one by one and observe if the door closes or further opens “on its own.” (Whether it closes or opens will depend on the direction of the air handler-driven air flow.) Rooms served by air-moved doors have restricted return air flow and need pressure relief as described above.
Maintaining and Upgrading Existing Duct Systems
Sealing your ducts to prevent leaks is even more important if the ducts are located in an unconditioned area such as an attic or vented crawlspace. If the supply ducts are leaking, heated or cooled air can be forced out of unsealed joints and lost. In addition, unconditioned air can be drawn into return ducts through unsealed joints.
Although minor duct repairs are easy to make, qualified professionals should seal and insulate ducts in unconditioned spaces to ensure the use of appropriate sealing materials.
Aside from sealing your ducts, the simplest and most effective means of maintaining your air distribution system is to ensure that furniture and other objects are not blocking the airflow through your registers, and to vacuum the registers to remove any dust buildup.
Existing duct systems often suffer from design deficiencies in the return air system, and modifications by the homeowner (or just a tendency to keep doors closed) may contribute to these problems. Any rooms with a lack of sufficient return airflow may benefit from relatively simple upgrades, such as the installation of new return-air grilles, undercutting doors for return air, or installing a jumper duct.
Some rooms may also be hard to heat and cool because of inadequate supply ducts or grilles. If this is the case, you should first examine whether the problem is the room itself: fix any problems with insulation, air leakage, or inefficient windows first. If the problem persists, you may be able to increase the size of the supply duct or add an additional duct to provide the needed airflow to the room.
Minor Duct Repair Tips for Minimizing Energy Losses in Ducts
- Check your ducts for air leaks. First, look for sections that should be joined but have separated and then look for obvious holes.
- Duct mastic is the preferred material for sealing ductwork seams and joints. It is more durable than any available tape and generally easier for a do-it-yourself installation. Its only drawback is that it will not bridge gaps over ¼ inch. Such gaps must be first bridged with web-type drywall tape, or a good quality heat approved tape.
- If you use tape to seal your ducts, avoid cloth-backed, rubber adhesive duct tape — it tends to fail quickly. Instead, use mastic, butyl tape, foil tape, or other heat-approved tapes. Look for tape with the Underwriters Laboratories (UL) logo.
- Remember that insulating ducts in the basement will make the basement colder. If both the ducts and the basement walls are not insulated, consider insulating both. Water pipes and drains in unconditioned spaces could freeze and burst if the heat ducts are fully insulated because there would be no heat source to prevent the space from freezing in cold weather. However, using an electric heating tape wrap on the pipes can prevent this. Check with a professional contractor.
- Hire a professional to install both supply and return registers in the basement rooms after converting your basement to a living area.
- Be sure a well-sealed vapor barrier exists on the outside of the insulation on cooling ducts to prevent moisture condensation.
- If you have a fuel-burning furnace, stove, or other appliance or an attached garage, install a carbon monoxide (CO) monitor to alert you to harmful CO levels.
- Be sure to get professional help when doing ductwork. A qualified professional should always perform changes and repairs to a duct system.
6118 Guadalupe St Houston TX 77016 – Third-party Energy Test: Blower Door & Duct Test

6118 Guadalupe St Houston TX 77016
Third-party Energy Testing
Blower Doors: What Are They and How Do They Work?
A blower door test is a powerful fan that a trained energy professional temporarily mounts into the frame of an exterior doorway in your home. After calibrating the device, the fan pulls air out of the house, lowering the air pressure inside. The higher outside air pressure then flows in through all unsealed gaps, cracks and openings such as gaps, cracks, or wiring penetrations. If conditions do not allow for lowering the pressure in the home, the fan may also be operated in reverse, with air pressure increased inside the home.
While the blower door test is being conducted, the analyst may use an infrared camera to look at the walls, ceilings, and floors, to find specific locations where insulation is missing, and air is leaking. The analyst may also use a nontoxic smoke pencil to detect air leaks in your home. These tests determine the air infiltration rate of your home, which is recorded on a laptop or tablet.
The blower door test is conducted as part of the energy assessment of your home. Your contractor may also operate the blower door while performing air sealing (a method known as blower door assisted air sealing), and after to measure and verify the level of air leakage reduction achieved.
Blower doors consist of a frame and flexible panel that fit in a doorway, a variable-speed fan, a digital pressure gauge to measure the pressure differences inside and outside the home, which are connected to a device for measuring airflow, known as a manometer.
There are two types of blower doors: calibrated and uncalibrated. It is important that auditors use a calibrated door. This type of blower door has several gauges that measure the amount of air flowing out of the house through the fan.
Uncalibrated blower doors can only locate leaks in homes. They provide no method for determining the overall tightness of the home.
The calibrated blower door’s data allow your contractor to quantify the amount of air leakage prior to installation of air-sealing improvements, and the reduction in leakage achieved after air-sealing is completed.
Professional energy assessors use blower door tests to help determine a home’s airtightness. Our blower door instructional video illustrates how a blower door test is performed, and how your contractor utilizes the diagnostic information provided to identify areas of air leakage in your home and make energy-saving improvements.
102 E 44th St Unit C Houston TX 77018 – Minimizing Energy Losses in Ducts

102 E 44th St Unit C Houston TX 77018
Minimizing energy losses in ducts
Minimizing energy losses in ducts by seeing if the ducts are poorly sealed or insulated. That could tell you why your energy bill in high. Your air ducts are one of the most important systems in your home, and if the ducts are poorly sealed or insulated, they are likely contributing to higher energy bills.
Your home’s duct system is a branching network of tubes in the walls, floors, and ceilings; it carries the air from your home’s furnace and central air conditioner to each room. Ducts are made of sheet metal, fiberglass, or other materials.
Ducts that leak heated air into unheated spaces can add hundreds of dollars a year to your heating and cooling bills, but you can reduce that loss by sealing and insulating your ducts. Insulating ducts in unconditioned spaces is usually very cost-effective. Existing ducts may also be blocked or may require simple upgrades.
Designing and Installing New Duct Systems
In new home construction or in retrofits, proper duct system design is critical. In recent years, energy-saving designs have sought to include ducts and heating systems in the conditioned space.
Efficient and well-designed duct systems distribute air properly throughout your home without leaking to keep all rooms at a comfortable temperature. The system should provide balanced supply and return flow to maintain a neutral pressure within the house.
Even well sealed and insulated ducts will leak and lose some heat, so many new energy-efficient homes place the duct system within the conditioned space of the home. The simplest way to accomplish this is to hide the ducts in dropped ceilings and in corners of rooms. Ducts can also be located in a sealed and insulated chase extending into the attic or built into raised floors. In both of these latter cases, care must be taken during construction to prevent contractors from using the duct chases for wiring or other utilities.
In either case, actual ducts must be used — chases and floor cavities should not be used as ducts. Regardless of where they are installed, ducts should be well sealed. Although ducts can be configured in a number of ways, the “trunk and branch” and “radial” supply duct configurations are most suitable for ducts located in conditioned spaces.
Air return duct systems can be configured in two ways: each room can have a return duct that sends air back to the heating and cooling equipment or return grills can be located in central locations on each floor. For the latter case, either grills must be installed to allow air to pass out of closed rooms, or short “jumper ducts” can be installed to connect the vent in one room with the next, allowing air to flow back to the central return grilles. Door undercuts help, but they are usually not sufficient for return airflow.
You can perform a simple check for adequate return air capacity by doing the following:
- Close all exterior doors and windows
- Close all interior room doors
- Turn on the central air handler
- “Crack” interior doors one by one and observe if the door closes or further opens “on its own.” (Whether it closes or opens will depend on the direction of the air handler-driven air flow.) Rooms served by air-moved doors have restricted return air flow and need pressure relief as described above.
Maintaining and Upgrading Existing Duct Systems
Sealing your ducts to prevent leaks is even more important if the ducts are located in an unconditioned area such as an attic or vented crawlspace. If the supply ducts are leaking, heated or cooled air can be forced out of unsealed joints and lost. In addition, unconditioned air can be drawn into return ducts through unsealed joints.
Although minor duct repairs are easy to make, qualified professionals should seal and insulate ducts in unconditioned spaces to ensure the use of appropriate sealing materials.
Aside from sealing your ducts, the simplest and most effective means of maintaining your air distribution system is to ensure that furniture and other objects are not blocking the airflow through your registers, and to vacuum the registers to remove any dust buildup.
Existing duct systems often suffer from design deficiencies in the return air system, and modifications by the homeowner (or just a tendency to keep doors closed) may contribute to these problems. Any rooms with a lack of sufficient return airflow may benefit from relatively simple upgrades, such as the installation of new return-air grilles, undercutting doors for return air, or installing a jumper duct.
Some rooms may also be hard to heat and cool because of inadequate supply ducts or grilles. If this is the case, you should first examine whether the problem is the room itself: fix any problems with insulation, air leakage, or inefficient windows first. If the problem persists, you may be able to increase the size of the supply duct or add an additional duct to provide the needed airflow to the room.
Minor Duct Repair Tips for Minimizing Energy Losses in Ducts
- Check your ducts for air leaks. First, look for sections that should be joined but have separated and then look for obvious holes.
- Duct mastic is the preferred material for sealing ductwork seams and joints. It is more durable than any available tape and generally easier for a do-it-yourself installation. Its only drawback is that it will not bridge gaps over ¼ inch. Such gaps must be first bridged with web-type drywall tape, or a good quality heat approved tape.
- If you use tape to seal your ducts, avoid cloth-backed, rubber adhesive duct tape — it tends to fail quickly. Instead, use mastic, butyl tape, foil tape, or other heat-approved tapes. Look for tape with the Underwriters Laboratories (UL) logo.
- Remember that insulating ducts in the basement will make the basement colder. If both the ducts and the basement walls are not insulated, consider insulating both. Water pipes and drains in unconditioned spaces could freeze and burst if the heat ducts are fully insulated because there would be no heat source to prevent the space from freezing in cold weather. However, using an electric heating tape wrap on the pipes can prevent this. Check with a professional contractor.
- Hire a professional to install both supply and return registers in the basement rooms after converting your basement to a living area.
- Be sure a well-sealed vapor barrier exists on the outside of the insulation on cooling ducts to prevent moisture condensation.
- If you have a fuel-burning furnace, stove, or other appliance or an attached garage, install a carbon monoxide (CO) monitor to alert you to harmful CO levels.
- Be sure to get professional help when doing ductwork. A qualified professional should always perform changes and repairs to a duct system.
Troubleshoot – 218 North Ave A Freeport Texas

Troubleshoot – High Humidity
Call us today to schedule a troubleshoot on your house.
45L Home Tax Credit – 954 Highland Sound

954 Highland Sound
45L Home Tax Credit
If you are building between 2015 and 2018 standards, you qualify for the 45L Home Tax Credit. Call us for more information. Home Ready Inspections is certified by an accredited Rating Provider to inspect and test a home in order to evaluate each of the minimum rated features and complete a Home Energy Rating according to the RESNET Standards.
Call today to schedule your Blower Door and Duct Blaster test today.
832-661-6154
Energy Code Inspection – Sola Salons Beaumont, Texas
 Energy Code Inspection
Post commercial stations in Beaumont Texas.
Call today to schedule
832-661-6154
45L Home Tax Credit – 1407 Bonnie Brae St Houston, TX 77006

1407 Bonnie Brae St Houston, TX 77006
45L Home Tax Credit
If you are building between 2015 and 2018 standards, you qualify for the 45L Home Tax Credit. Call us for more information. Home Ready Inspections is certified by an accredited Rating Provider to inspect and test a home in order to evaluate each of the minimum rated features and complete a Home Energy Rating according to the RESNET Standards.
Call today to schedule your Blower Door and Duct Blaster test today.
832-661-6154
45L Tax Credit Form 8909
45L Tax Credit: 8909 Form – Energy Efficient Home Credit

500 Texas Ave League City TX 77573
Energy Saving Requirements
The credit amount is based on the extent to which each new energy efficient home meets the energy saving requirements discussed below.
50% energy efficient standard (for homes sold or leased before 2023).
The credit is $2,000 for a dwelling unit that is certified to have an annual level of heating and cooling energy consumption at least 50% below the annual level of heating and cooling energy consumption of a comparable dwelling unit and has building envelope component improvements that account for at least 1/5 of the 50% reduction in energy consumption. A manufactured home meeting the requirements described above and the Federal Manufactured Home Construction and Safety Standards (FMHCSS) requirements (see 24 C.F.R. part 3280) is also eligible for the $2,000 credit.
Comparable dwelling unit.
A comparable dwelling unit:
- Is constructed in accordance with the standards of chapter 4 of the 2006 International Energy Conservation Code as such Code (including supplements) was in effect on January 1, 2006;
- Has air conditioners with a Seasonal Energy Efficiency Ratio (SEER) of 13, measured in accordance with 10 C.F.R. 430.23(m); and
- Has heat pumps with a SEER of 13 and a Heating Seasonal Performance Factor (HSPF) of 7.7, measured in accordance with 10 C.F.R. 430.23(m).
30% energy efficient standard (for homes sold or leased before 2023).
The credit is $1,000 for a manufactured home that doesn’t meet the 50% energy saving requirement but is certified to have an annual level of heating and cooling energy consumption at least 30% below the annual level of heating and cooling energy consumption of a comparable dwelling unit (discussed above) and:
- Meets FMHCSS requirements, and
- Has building envelope component improvements that account for at least 1/3 of the 30% reduction in energy consumption, or
- Meets the current requirements established by the Administrator of the Environmental Protection Agency under the Energy Star Labeled Homes program.
Heating and cooling energy and cost savings must be calculated using the procedures described in Residential Energy Services Network (RESNET) Publication 001-16, or an equivalent calculation procedure.
Single-family home requirements (for homes sold or leased after 2022).
A dwelling unit meets these requirements if the dwelling unit meets:
- The Energy Star Single-Family New Homes National Program Requirements 3.1; and
- The Energy Star Single-Family New Homes Program Requirements in effect on January 1, 2023, which are applicable for the location of the dwelling unit; or
- The Energy Star Manufactured Home National Program Requirements in effect on January 1, 2023.
Multi-family home requirements (for homes sold or leased after 2022).
A dwelling unit meets these requirements if the dwelling unit meets:
- The Energy Star Multi-Family New Construction National Program Requirements in effect on January 1, 2023; and
- The Energy Star Multi-Family New Construction Regional Program Requirements in effect on January 1, 2023, which are applicable for the location of the dwelling unit.
Prevailing wage requirements (for multi-family homes sold or leased after 2022).
The prevailing wage requirements with respect to any qualifying residence are that the eligible contractor shall ensure that any laborers and mechanics employed by the eligible contractor or any subcontractor in the construction of such residence shall be paid wages at rates not less than the prevailing rates for construction, alteration, or repair of a similar character in the locality in which such residence is located as most recently determined by the Secretary of Labor. For details, see Notice 2022-61, 2022-52 I.R.B. 560.
Certification
For homes sold or leased before 2023, an eligible contractor must obtain a certification that the dwelling unit meets the requirements of section 45L(c) (as in effect for homes sold or leased before 2023) before claiming the section 45L credit. The certification will be treated as satisfying the requirements of section 45L(c) if all the construction has been performed in a manner consistent with the design specifications provided to the eligible certifier and the certification contains all of the information required by section 3 of Notice 2008-35; or, for manufactured homes, section 3 or section 4 of Notice 2008-36
For homes sold or leased after 2022, an eligible contractor must obtain any certification(s) the dwelling unit needs to meet the applicable program requirement(s) referred to in section 45L(c) before claiming the section 45L credit. These program requirements are discussed earlier. Certification information is available on the referenced websites.
45L Home Tax Credit – 504 Texas Ave

504 Texas Ave League City TX 77573
45L Home Tax Credit
If you are building between 2015 and 2018 standards, you qualify for the 45L Home Tax Credit. Call us for more information. Home Ready Inspections is certified by an accredited Rating Provider to inspect and test a home in order to evaluate each of the minimum rated features and complete a Home Energy Rating according to the RESNET Standards.
Call today to schedule your Blower Door and Duct Blaster test today.
832-661-6154
45L Home Tax Credit – 10629 Jay Rd

10629 Jay Rd Hitchcock TX 77563
45L Home Tax Credit
If you are building between 2015 and 2018 standards, you qualify for the 45L Home Tax Credit. Call us for more information. Home Ready Inspections is certified by an accredited Rating Provider to inspect and test a home in order to evaluate each of the minimum rated features and complete a Home Energy Rating according to the RESNET Standards.
Call today to schedule your Blower Door and Duct Blaster test today.
832-661-6154
45L Home Tax Credit – 330 Jasper Cove Missouri City
 45L Home Tax Credit
If you are building between 2015 and 2018 standards, you qualify for the 45L Home Tax Credit. Call us for more information. Home Ready Inspections is certified by an accredited Rating Provider to inspect and test a home in order to evaluate each of the minimum rated features and complete a Home Energy Rating according to the RESNET Standards.
Call today to schedule your Blower Door and Duct Blaster test today.
832-661-6154
45L Tax Credit Form 8909
45L Tax Credit: 8909 Form – Energy Efficient Home Credit

4328 Walker St
Energy Saving Requirements
The credit amount is based on the extent to which each new energy efficient home meets the energy saving requirements discussed below.
50% energy efficient standard (for homes sold or leased before 2023).
The credit is $2,000 for a dwelling unit that is certified to have an annual level of heating and cooling energy consumption at least 50% below the annual level of heating and cooling energy consumption of a comparable dwelling unit and has building envelope component improvements that account for at least 1/5 of the 50% reduction in energy consumption. A manufactured home meeting the requirements described above and the Federal Manufactured Home Construction and Safety Standards (FMHCSS) requirements (see 24 C.F.R. part 3280) is also eligible for the $2,000 credit.
Comparable dwelling unit.
A comparable dwelling unit:
- Is constructed in accordance with the standards of chapter 4 of the 2006 International Energy Conservation Code as such Code (including supplements) was in effect on January 1, 2006;
- Has air conditioners with a Seasonal Energy Efficiency Ratio (SEER) of 13, measured in accordance with 10 C.F.R. 430.23(m); and
- Has heat pumps with a SEER of 13 and a Heating Seasonal Performance Factor (HSPF) of 7.7, measured in accordance with 10 C.F.R. 430.23(m).
30% energy efficient standard (for homes sold or leased before 2023).
The credit is $1,000 for a manufactured home that doesn’t meet the 50% energy saving requirement but is certified to have an annual level of heating and cooling energy consumption at least 30% below the annual level of heating and cooling energy consumption of a comparable dwelling unit (discussed above) and:
- Meets FMHCSS requirements, and
- Has building envelope component improvements that account for at least 1/3 of the 30% reduction in energy consumption, or
- Meets the current requirements established by the Administrator of the Environmental Protection Agency under the Energy Star Labeled Homes program.
Heating and cooling energy and cost savings must be calculated using the procedures described in Residential Energy Services Network (RESNET) Publication 001-16, or an equivalent calculation procedure.
Single-family home requirements (for homes sold or leased after 2022).
A dwelling unit meets these requirements if the dwelling unit meets:
- The Energy Star Single-Family New Homes National Program Requirements 3.1; and
- The Energy Star Single-Family New Homes Program Requirements in effect on January 1, 2023, which are applicable for the location of the dwelling unit; or
- The Energy Star Manufactured Home National Program Requirements in effect on January 1, 2023.
Multi-family home requirements (for homes sold or leased after 2022).
A dwelling unit meets these requirements if the dwelling unit meets:
- The Energy Star Multi-Family New Construction National Program Requirements in effect on January 1, 2023; and
- The Energy Star Multi-Family New Construction Regional Program Requirements in effect on January 1, 2023, which are applicable for the location of the dwelling unit.
Prevailing wage requirements (for multi-family homes sold or leased after 2022).
The prevailing wage requirements with respect to any qualifying residence are that the eligible contractor shall ensure that any laborers and mechanics employed by the eligible contractor or any subcontractor in the construction of such residence shall be paid wages at rates not less than the prevailing rates for construction, alteration, or repair of a similar character in the locality in which such residence is located as most recently determined by the Secretary of Labor. For details, see Notice 2022-61, 2022-52 I.R.B. 560.
Certification
For homes sold or leased before 2023, an eligible contractor must obtain a certification that the dwelling unit meets the requirements of section 45L(c) (as in effect for homes sold or leased before 2023) before claiming the section 45L credit. The certification will be treated as satisfying the requirements of section 45L(c) if all the construction has been performed in a manner consistent with the design specifications provided to the eligible certifier and the certification contains all of the information required by section 3 of Notice 2008-35; or, for manufactured homes, section 3 or section 4 of Notice 2008-36
For homes sold or leased after 2022, an eligible contractor must obtain any certification(s) the dwelling unit needs to meet the applicable program requirement(s) referred to in section 45L(c) before claiming the section 45L credit. These program requirements are discussed earlier. Certification information is available on the referenced websites.
What is the 45L Tax Credit and how do I qualify?
What is the 45L Tax Credit and how do I qualify?
45L Tax Credit:
Have you heard about the 45L Tax Credit for new residential & multi-family construction? Now it’s easier to qualify and there are no changes on how you are building. Each home sold from 01/01/2023 – 12/31/2032 will qualify for a $2500 tax credit for that year.
Call us today for more information.
45L Home Tax Credit – 5824 Highland Sky Ln Houston TX 77091

5824 Highland Sky Ln Houston TX 77091
45L Home Tax Credit
If you are building between 2015 and 2018 standards, you qualify for the 45L Home Tax Credit. Call us for more information. Home Ready Inspections is certified by an accredited Rating Provider to inspect and test a home in order to evaluate each of the minimum rated features and complete a Home Energy Rating according to the RESNET Standards.
Call today to schedule your Blower Door and Duct Blaster test today.
832-661-6154
What is the 45L Tax Credit and how do I qualify?
What is the 45L Tax Credit and how do I qualify?
45L Tax Credit:
Have you heard about the 45L Tax Credit for new residential & multi-family construction? Now it’s easier to qualify and there are no changes on how you are building. Each home sold from 01/01/2023 – 12/31/2032 will qualify for a $2500 tax credit for that year.
Call us today for more information.
45L Home Tax Credit – 4118 Gairloch Ln Houston TX 77025

4118 Gairloch Ln Houston TX 77025
45L Home Tax Credit
If you are building between 2015 and 2018 standards, you qualify for the 45L Home Tax Credit. Call us for more information. Home Ready Inspections is certified by an accredited Rating Provider to inspect and test a home in order to evaluate each of the minimum rated features and complete a Home Energy Rating according to the RESNET Standards.
Call today to schedule your Blower Door and Duct Blaster test today.
832-661-6154
What is the 45L Tax Credit and how do I qualify?
What is the 45L Tax Credit and how do I qualify?
45L Tax Credit:
Have you heard about the 45L Tax Credit for new residential & multi-family construction? Now it’s easier to qualify and there are no changes on how you are building. Each home sold from 01/01/2023 – 12/31/2032 will qualify for a $2500 tax credit for that year.
Call us today for more information.
45L Home Tax Credit – 2008 Common St Houston TX 77009

2008 Common St Houston TX 77009
45L Home Tax Credit
If you are building between 2015 and 2018 standards, you qualify for the 45L Home Tax Credit. Call us for more information. Home Ready Inspections is certified by an accredited Rating Provider to inspect and test a home in order to evaluate each of the minimum rated features and complete a Home Energy Rating according to the RESNET Standards.
Call today to schedule your Blower Door and Duct Blaster test today.
832-661-6154
What is the 45L Tax Credit and how do I qualify?
What is the 45L Tax Credit and how do I qualify?
45L Tax Credit:
Have you heard about the 45L Tax Credit for new residential & multi-family construction? Now it’s easier to qualify and there are no changes on how you are building. Each home sold from 01/01/2023 – 12/31/2032 will qualify for a $2500 tax credit for that year.
Call us today for more information.
45L Home Tax Credit – 2506 Anita St Houston TX 77004

2506 Anita St Houston TX 77004
45L Home Tax Credit
If you are building between 2015 and 2018 standards, you qualify for the 45L Home Tax Credit. Call us for more information. Home Ready Inspections is certified by an accredited Rating Provider to inspect and test a home in order to evaluate each of the minimum rated features and complete a Home Energy Rating according to the RESNET Standards.
Call today to schedule your Blower Door and Duct Blaster test today.
832-661-6154
What is the 45L Tax Credit and how do I qualify?
What is the 45L Tax Credit and how do I qualify?
45L Tax Credit:
Have you heard about the 45L Tax Credit for new residential & multi-family construction? Now it’s easier to qualify and there are no changes on how you are building. Each home sold from 01/01/2023 – 12/31/2032 will qualify for a $2500 tax credit for that year.
Call us today for more information.
45L Home Tax Credit – 1907 Hickory St Houston TX 77007

1907 Hickory St Houston TX 77007
45L Home Tax Credit
If you are building between 2015 and 2018 standards, you qualify for the 45L Home Tax Credit. Call us for more information. Home Ready Inspections is certified by an accredited Rating Provider to inspect and test a home in order to evaluate each of the minimum rated features and complete a Home Energy Rating according to the RESNET Standards.
Call today to schedule your Blower Door and Duct Blaster test today.
832-661-6154
What is the 45L Tax Credit and how do I qualify?
What is the 45L Tax Credit and how do I qualify?
45L Tax Credit:
Have you heard about the 45L Tax Credit for new residential & multi-family construction? Now it’s easier to qualify and there are no changes on how you are building. Each home sold from 01/01/2023 – 12/31/2032 will qualify for a $2500 tax credit for that year.
Call us today for more information.
45L Home Tax Credit – 1212 E 29th St Houston TX 77009

1212 E 29th St Houston TX 77009
45L Home Tax Credit
If you are building between 2015 and 2018 standards, you qualify for the 45L Home Tax Credit. Call us for more information. Home Ready Inspections is certified by an accredited Rating Provider to inspect and test a home in order to evaluate each of the minimum rated features and complete a Home Energy Rating according to the RESNET Standards.
Call today to schedule your Blower Door and Duct Blaster test today.
832-661-6154
What is the 45L Tax Credit and how do I qualify?
What is the 45L Tax Credit and how do I qualify?
45L Tax Credit:
Have you heard about the 45L Tax Credit for new residential & multi-family construction? Now it’s easier to qualify and there are no changes on how you are building. Each home sold from 01/01/2023 – 12/31/2032 will qualify for a $2500 tax credit for that year.
Call us today for more information.
45L Home Tax Credit – 1079 W 41st St Houston TX 77018

1079 W 41st St Houston TX 77018
45L Home Tax Credit
If you are building between 2015 and 2018 standards, you qualify for the 45L Home Tax Credit. Call us for more information. Home Ready Inspections is certified by an accredited Rating Provider to inspect and test a home in order to evaluate each of the minimum rated features and complete a Home Energy Rating according to the RESNET Standards.
Call today to schedule your Blower Door and Duct Blaster test today.
832-661-6154
What is the 45L Tax Credit and how do I qualify?
What is the 45L Tax Credit and how do I qualify?
45L Tax Credit:
Have you heard about the 45L Tax Credit for new residential & multi-family construction? Now it’s easier to qualify and there are no changes on how you are building. Each home sold from 01/01/2023 – 12/31/2032 will qualify for a $2500 tax credit for that year.
Call us today for more information.
45L Home Tax Credit – 807 Arlington St Houston TX 77007

807 Arlington St Houston TX 77007
45L Home Tax Credit
If you are building between 2015 and 2018 standards, you qualify for the 45L Home Tax Credit. Call us for more information. Home Ready Inspections is certified by an accredited Rating Provider to inspect and test a home in order to evaluate each of the minimum rated features and complete a Home Energy Rating according to the RESNET Standards.
Call today to schedule your Blower Door and Duct Blaster test today.
832-661-6154
What is the 45L Tax Credit and how do I qualify?
What is the 45L Tax Credit and how do I qualify?
45L Tax Credit:
Have you heard about the 45L Tax Credit for new residential & multi-family construction? Now it’s easier to qualify and there are no changes on how you are building. Each home sold from 01/01/2023 – 12/31/2032 will qualify for a $2500 tax credit for that year.
Call us today for more information.
45L Home Tax Credit – 736 Allston St Houston TX 77007

736 Allston St Houston TX 77007
45L Home Tax Credit
If you are building between 2015 and 2018 standards, you qualify for the 45L Home Tax Credit. Call us for more information. Home Ready Inspections is certified by an accredited Rating Provider to inspect and test a home in order to evaluate each of the minimum rated features and complete a Home Energy Rating according to the RESNET Standards.
Call today to schedule your Blower Door and Duct Blaster test today.
832-661-6154
What is the 45L Tax Credit and how do I qualify?
What is the 45L Tax Credit and how do I qualify?
45L Tax Credit:
Have you heard about the 45L Tax Credit for new residential & multi-family construction? Now it’s easier to qualify and there are no changes on how you are building. Each home sold from 01/01/2023 – 12/31/2032 will qualify for a $2500 tax credit for that year.
Call us today for more information.
45L Home Tax Credit – 430 Mississippi St Houston TX 77029

430 Mississippi St Houston TX 77029
45L Home Tax Credit
If you are building between 2015 and 2018 standards, you qualify for the 45L Home Tax Credit. Call us for more information. Home Ready Inspections is certified by an accredited Rating Provider to inspect and test a home in order to evaluate each of the minimum rated features and complete a Home Energy Rating according to the RESNET Standards.
Call today to schedule your Blower Door and Duct Blaster test today.
832-661-6154
45L Home Tax Credit – 374 Sulky Trail St Houston TX 77060

374 Sulky Trail St Houston TX 77060
45L Home Tax Credit
If you are building between 2015 and 2018 standards, you qualify for the 45L Home Tax Credit. Call us for more information. Home Ready Inspections is certified by an accredited Rating Provider to inspect and test a home in order to evaluate each of the minimum rated features and complete a Home Energy Rating according to the RESNET Standards.
Call today to schedule your Blower Door and Duct Blaster test today.
832-661-6154
What is the 45L Tax Credit and how do I qualify?
What is the 45L Tax Credit and how do I qualify?
45L Tax Credit:
Have you heard about the 45L Tax Credit for new residential & multi-family construction? Now it’s easier to qualify and there are no changes on how you are building. Each home sold from 01/01/2023 – 12/31/2032 will qualify for a $2500 tax credit for that year.
Call us today for more information.
45L Home Tax Credit – 1507 Robin St Unit B Houston TX 77019

45L Tax Credit – 1507 Robin St Unit B Houston TX 77019
45L Home Tax Credit
If you are building between 2015 and 2018 standards, you qualify for the 45L Home Tax Credit. Call us for more information. Home Ready Inspections is certified by an accredited Rating Provider to inspect and test a home in order to evaluate each of the minimum rated features and complete a Home Energy Rating according to the RESNET Standards.
Call today to schedule your Blower Door and Duct Blaster test today.
832-661-6154
45L Home Tax Credit Flyer – Do You Qualify?

Energy Star – 45L Tax Credits for Zero Energy Ready Homes

1305 Overhill St Houston TX 77018 – Energy Star
45L Tax Credits for Zero Energy Ready Homes
Disclaimer: (Energy Star) This webpage provides an overview of the DOE Zero Energy Ready Home program and how it relates to the New Energy Efficient Home Tax Credit found in section 45L of the Internal Revenue Code. The information provided here does not constitute professional tax advice or other professional financial guidance. It should not be used as the only source of information when making decisions regarding design, purchasing, investments, or the tax implications of new home construction, or when executing other binding agreements. In the event that there is conflict between information provided on this webpage and guidance or notices published by IRS, the information published by IRS shall take precedence.
The Updated Section 45L
The Inflation Reduction Act of 2022 (IRA) amended Internal Revenue Code Section 45L to provide taxpayers with a tax credit for eligible new or substantially reconstructed homes that meet applicable ENERGY STAR home program or DOE Zero Energy Ready Home (ZERH) program requirements. The new 45L provisions include two tiers of credits, with the higher credits for eligible homes and dwelling units certified to applicable ZERH program requirements. The 45L credit is $5,000 for single family and manufactured homes eligible to participate in the EPA’s ENERGY STAR Residential New Construction Program or the ENERGY STAR Manufactured New Homes Program, respectively, and which are certified to applicable ZERH program requirements. The 45L credit is $1,000 for dwelling units that are part of a building eligible to participate in the ENERGY STAR Multifamily New Construction Program, and which are certified to applicable ZERH program requirements, unless the project meets prevailing wage requirements, in which case the 45L credit is $5,000 per dwelling unit. These new 45L rules apply to qualified energy efficient homes acquired after December 31, 2022, and before January 1, 2033, for use as a residence during the taxable year. DOE continues to coordinate with the Internal Revenue Service (IRS) regarding forthcoming IRS 45L guidance.
DOE Zero Energy Ready Home (ZERH) Program Applicability for 45L Tax Credit, by Calendar Year
ZERH program requirements vary by housing sector. To improve the usability of the program requirements and the certification process for different sectors, DOE is developing and maintaining program requirements documents for each major housing sector. DOE anticipates updating these documents over the coming years, with new editions of the requirements referred to as versions.
The three housing sector tables below indicate DOE’s anticipated version release schedule for the ZERH program. The certification requirements for each housing sector are included below with links to detailed requirements documents (PDF) for each program version. IRS guidance will establish when a dwelling unit needs to be certified to the version in effect for that housing sector as listed below to qualify for the ZERH provisions of 45L tax credit. The tables list all current and planned versions through 2025, by Calendar Year (January 1-December 31). In conjunction with IRS, DOE will provide additional information on any planned ZERH program changes beyond 2025 on future dates to be determined. Note, for certain future planned versions the requirements documents are still under development.
Energy Star – 45L Tax Credits for Zero Energy Ready Homes

209 E 23rd St Houston TX 77008 – Energy Star
45L Tax Credits for Zero Energy Ready Homes
Disclaimer: (Energy Star) This webpage provides an overview of the DOE Zero Energy Ready Home program and how it relates to the New Energy Efficient Home Tax Credit found in section 45L of the Internal Revenue Code. The information provided here does not constitute professional tax advice or other professional financial guidance. It should not be used as the only source of information when making decisions regarding design, purchasing, investments, or the tax implications of new home construction, or when executing other binding agreements. In the event that there is conflict between information provided on this webpage and guidance or notices published by IRS, the information published by IRS shall take precedence.
The Updated Section 45L
The Inflation Reduction Act of 2022 (IRA) amended Internal Revenue Code Section 45L to provide taxpayers with a tax credit for eligible new or substantially reconstructed homes that meet applicable ENERGY STAR home program or DOE Zero Energy Ready Home (ZERH) program requirements. The new 45L provisions include two tiers of credits, with the higher credits for eligible homes and dwelling units certified to applicable ZERH program requirements. The 45L credit is $5,000 for single family and manufactured homes eligible to participate in the EPA’s ENERGY STAR Residential New Construction Program or the ENERGY STAR Manufactured New Homes Program, respectively, and which are certified to applicable ZERH program requirements. The 45L credit is $1,000 for dwelling units that are part of a building eligible to participate in the ENERGY STAR Multifamily New Construction Program, and which are certified to applicable ZERH program requirements, unless the project meets prevailing wage requirements, in which case the 45L credit is $5,000 per dwelling unit. These new 45L rules apply to qualified energy efficient homes acquired after December 31, 2022, and before January 1, 2033, for use as a residence during the taxable year. DOE continues to coordinate with the Internal Revenue Service (IRS) regarding forthcoming IRS 45L guidance.
DOE Zero Energy Ready Home (ZERH) Program Applicability for 45L Tax Credit, by Calendar Year
ZERH program requirements vary by housing sector. To improve the usability of the program requirements and the certification process for different sectors, DOE is developing and maintaining program requirements documents for each major housing sector. DOE anticipates updating these documents over the coming years, with new editions of the requirements referred to as versions.
The three housing sector tables below indicate DOE’s anticipated version release schedule for the ZERH program. The certification requirements for each housing sector are included below with links to detailed requirements documents (PDF) for each program version. IRS guidance will establish when a dwelling unit needs to be certified to the version in effect for that housing sector as listed below to qualify for the ZERH provisions of 45L tax credit. The tables list all current and planned versions through 2025, by Calendar Year (January 1-December 31). In conjunction with IRS, DOE will provide additional information on any planned ZERH program changes beyond 2025 on future dates to be determined. Note, for certain future planned versions the requirements documents are still under development.